Basic to advanced CSS interview questions
CSS is used to design the structure of a web page or web applications
Generally, we know that by using HTML we can create the structure of a web page, that structure will designed by using CSS
In a web page, We can alter the font, color, size, and spacing of our content, split it into multiple columns, Transformations, or add animations and other decorative features.
In short, CSS stands for Cascading Style Sheets. CSS is a collection of predefined style properties, by using those properties, we can design the web page
CSS will describe how elements should be rendered on the screen
CSS Syntax consists of a selector, declaration block, and properties
selector {
    property1: value1;
    property2: value2;
    property3: value3;
    ....
    .....
}selector: A selector is used to select the HTML elements from a document to design.
Declaration block is represented with { }
Property and Values are separated by colon( : )
Every pair(property and value) should ends with semicolon( ; )
Majorly, there are 3 types of styles
- Inline styles
- Internal styles
- External styles
Inline styles are added to an HTML element by using the style attribute
<h1 style="color: red; font-size: 18px;">Hello CSS</h1>
Inline styles are not reusable
Internal styles are added to an HTML using <style> tag inside <head> section
<!DOCTYPE html>
<html lang="en">
<head>

    <title>Internal Styles</title>
    <style>
        /* Internal Styles */
        body {
            font-family: Arial, sans-serif;
            background-color: #f0f0f0;
        }
        h1 {
            color: blue;
        }
        p {
            color: red;
        }
    </style>
</head>
<body>
    <div class="container">
        <h1>Internal Styles!</h1>
        <p>Internal styles are reusable within the current
         HTML document only</p>
    </div>
</body>
</html>
External styles are the CSS styles that are defined in separate CSS files and linked into the HTML document by using the <link> tag.
We can reuse the external styles within the entire web application
External CSS files are saved with .css extensions like: styles.css and main.css. These files contain a collection of CSS rules, selectors, and declarations.
styles.css
body {
    font-family: Arial, sans-serif;
    background-color: #f0f0f0;
}
h1 {
    color: blue;
}
p {
    color: red;
}
welcome.html
<!DOCTYPE html>
<html>
<head>
    <meta charset="UTF-8">
    <meta name="viewport" content="width=device-width, initial-scale=1.0">
    <title>External Styles</title>
    <!-- Linking External CSS File -->
    <link rel="stylesheet" href="styles.css">
</head>
<body>
    <div class="container">
        <h1>External Styles!</h1>
        <p>This example shows how to link External CSS styles into an HTML document.</p>
    </div>
</body>
</html>
A CSS selector is used to select HTML elements to design. Selectors are the building blocks of CSS syntax.
We know that Selectors are a fundamental part of CSS syntax, as they determine which elements the CSS rules will affect.
There are different types of selectors
- Element Selector or Name Selector
- ID Selector
- Class Selector
- Attribute Selectors
- Descendant Selectors
- Child Selectors
- Universal Selector
- Pseudo Selectors ( Pseudo-classes and Pseudo-elements )
Selects all the elements with a specific class attribute. In CSS Classes are represented with a period (.) followed by the class name.
For example, .classname selects all elements from an HTML document with class="classname".
<head>
    .container{
        height: 100px;
        width: 200px;
        border: 1px solid red;
    }
</head>
<body>
    ---
    ---
    <div class="container">

    </div>
    <section class="container">

    </section>
    ---
    ---
</body>
<head>
<style>
  #title1{
    color: red;
  }
  #title2{
    color: blue
  }
</style>
</head>
<body>
  ---
  ---
  <h1 id="title1">Title One</h1>
  <h1 id="title2">Title Two</h1>
  ---
  ---
</body>
| [attribute ~= value] | [name ~= "user"] | It will select all the elements with a name attribute containing the word user |
| [attribute |= value] | input[name |= "user"] | It will select all <input /> elements with a name attribute value equal to user or starting with user |
| [attribute ^= value] | a[href ^= "www"] | It will select all the anchor <a> elements whose href attribute value begins with www |
| [attribute $= value] | img[src $= ".png"] | It will select all <img /> elements whose src attribute value ends with .png |
| [attribute *= value] | a[href *= "codify"] | It will select all the <a> elements whose href attribute value contains a substring codify |
A child selector consists of two selectors separated by a greater-than sign (>)
div > p: selects all <p> elements that are direct children of <div> elements.
section > a: selects all <a> elements that are direct children of <section> elements.
Descendant selector consists of two or more selectors separated by a space.
section p: It will select all the <p> elements that are descendants of <section> elements.
By using div + p selector, we can select the first <p> element that is placed immediately after <div> elements
<div>
  <h1>Hello Codify</h1>
  <p>This is Ram from India</p>
</div>
<p>Welcome to India</p>
<p>India is beautiful country</p>
Pseudo-classes will represent a special state of an element. all pseudo-cllases are preceded by colon( : )
some of the commonly used pseudo-classes in CSS are:
:hover
:active
:visited
:focus
:first-child
:last-child
:nth-child(n)
:disabled
:not
:empty
:checked
By using Pseudo-elements we can style specific parts of an element. Pseudo-elements are represented with a double colon (::)
Some of Pseudo-elements are:
::after
::before
::selection
::first-line
::last-line
By using the :nth-child(n) selector, we can select the elements based on their position
<style>
    p:nth-child(3){
        color: red;
    }
</style>

<body>
    <p>This is para one</p>
    <p>This is para two</p>
    <p>This is para three</p>
    <p>This is para four</p>
    <p>This is para five</p>
    <p>This is para six</p>
</body>
<style>
    ul li:nth-child(odd){
        color: red;
    }
    ul li:nth-child(even){
        color: blue;
    }
</style>
<body>
    <ul>
        <li>HTML</li>
        <li>CSS</li>
        <li>JavaScript</li>
        <li>jQuery</li>
        <li>ReactJS</li>
        <li>Angular</li>
        <li>Vue</li>
        <li>NodeJs</li>
    </ul>
</body>
Output:

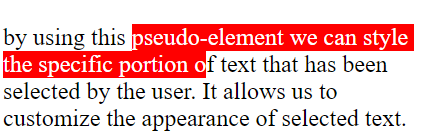
by using this pseudo-element we can style the specific portion of text that has been selected by the user. It allows us to customize the appearance of selected text.
<style>
    ::selection {
        background-color: red;
        color: white;
    }
</style>


<body>
    <p>by using this pseudo-element we can style the specific portion of text that has been
selected by the user. It allows us to customize the appearance of selected text.</p>
</body>
Output
Grouping selectors will allow us to apply the same style rules to multiple selectors, because of grouping multiple selectors, we can reduce the no.of lines of code.
So that our code looks more concise and easier. Grouping selectors by separated by commas (,).
h2, h3, h4 {
    font-family: sans-serif;
    color: red;
}
h3, .heading-one, #sectiontitle {
    font-size: 28px;
    font-weight: bolder;
}
if we want to apply styles to all elements, then we can use universal selectors. Universal selectors are represented with asterisk ( * )
*{
    margin: 0;
    padding: 0;
    box-sizing: border-box;
    font-family: "Gill Sans", sans-serif;;
}
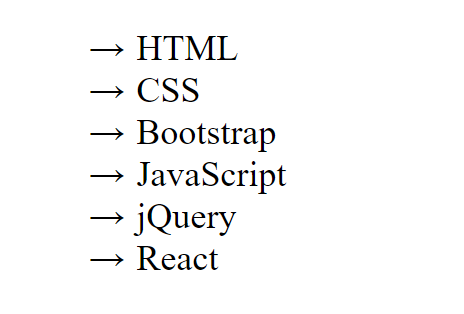
<style>
    ul {
        list-style-type: none;
    }
    li::before {
        content: "\2192";
        display: inline-block;
        margin-right: 5px;
    }
</style>
<body>
    <ul>
        <li>HTML</li>
        <li>CSS</li>
        <li>Bootstrap</li>
        <li>JavaScript</li>
        <li>jQuery</li>
        <li>React</li>
    </ul>
</body>
Output
!important declaration is used to give a specific style rule more priority or weight, it will override other style rules that are already added.
p {
    color: pink !important;
}

p {
    color: blue;
}
for all the <p> tags, pink color will apply, because of !important it has more weight
The computed value of a CSS property is the value that is transferred from parent to child during inheritance.
The specified value is nothing but a value of a CSS property that is received from the document's style sheet. Nothing but browser default styles also called Specified value.
The process of accessing the parent element properties into the children's elements
<p>This paragraph has <em>emphasized text</em> in it.</p>
<em> is the child element
<p> is the parent element
p {
  border: medium solid;
}

em {
  border: inherit;
}
Output
![]()
In CSS, certain properties are automatically passed down to child elements from their parent elements unless they're specifically altered.
Typical inherited properties comprise color, font-family, font-size, line-height, text-align, and others
Properties that are not inherited by default in CSS are known as non-inherited properties. These include attributes like width, height, margin, padding, border, background, and more.
Unlike inherited properties, child elements do not automatically adopt these attributes from their parent elements.
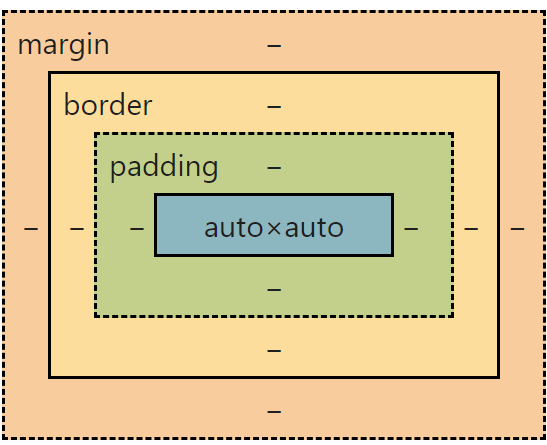
The Box Model in CSS is a core concept in web design and layout.
It describes the structure of an HTML element as a rectangular box with four distinct areas: content, padding, border, and margin. These areas collectively determine the overall size and appearance of an element on a web page.
Content: This is the innermost part of the box
Padding: The padding is the space between the content and the border
Border: The border surrounds the padding and content of the element
Margin: The margin is the space outside the border
By default, when you set the width and height of an element in CSS, the specified values only apply to the content area of the element. Any padding or border added to the element will increase its overall dimensions, potentially causing layout issues.
The box-sizing: border-box property changes this behavior by including the padding and border in the element's specified width and height, rather than adding them to the dimensions.
This means that the total width and height of the element will remain constant, regardless of the amount of padding or border applied.
By using margin property. margin provides space between the elements or around the elements
The size of the margin area is determined by the margin-top, margin-right, margin-bottom, margin-left, and shorthand margin properties
| Shorthand Property | Expanded Properties |
| margin: 10px; | margin-top: 10px; margin-right: 10px; margin-bottom: 10px; margin-left: 10px; |
| margin: 10px 20px; | margin-top: 10px; margin-right: 20px; margin-bottom: 10px; margin-left: 20px; |
| margin: 10px 20px 40px; | margin-top: 10px; margin-right: 20px; margin-bottom: 40px; margin-left: 20px; |
| margin: 10px 20px 30px 40px; | margin-top: 10px; margin-right: 20px; margin-bottom: 30px; margin-left: 30px; |
By using padding property. padding provides space inside of an element.
The thickness of the padding is determined by the padding-top, padding-right, padding-bottom, padding-left, and shorthand padding properties.
| Shorthand Property | Expanded Properties |
| padding: 10px; | padding-top: 10px; padding-right: 10px; padding-bottom: 10px; padding-left: 10px; |
| padding: 10px 20px; | padding-top: 10px; padding-right: 20px; padding-bottom: 10px; padding-left: 20px; |
| padding: 10px 20px 40px; | padding-top: 10px; padding-right: 20px; padding-bottom: 40px; padding-left: 20px; |
| padding: 10px 20px 30px 40px; | padding-top: 10px; padding-right: 20px; padding-bottom: 30px; padding-left: 30px; |
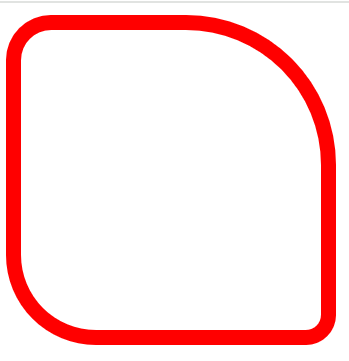
To create curved borders in CSS, we can use the border-radius property. This property allows you to specify the radius of each corner of an element's border.
<style> |
 |
If you want to specify different radius for different corners, you can use the longhand syntax:
<style> |
 |
border-style: none | solid | dotted | groove | ridge | double | dashed | outline | inherit
background: url('images/one.jpg') no-repeat center fixed, url('images/two.jpg') no-repeat top left fixed, url('images/three.jpg') no-repeat center right fixed ;
background-position: by using this property we can specify the starting position of a background image.
It can take values like top, bottom, left, right, center, or coordinate values in pixels or percentages.
background-position: top | left | bottom | right | center;
You can create gradients using the linear-gradient() or radial-gradient() functions within the background-image property.
Syntax: background-image: linear-gradient(to right, red, yellow);

- Background-color
- Background-image
- Background-repeat
- Background-position
- Background-size
- Background-attachment
